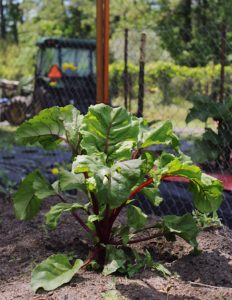
Beets
Beets Suppliers
Beets Growing Guides
- Michigan State University - How to Grow Beets - MSU Extension
- Penn State - Beet | Diseases and Pests, Description, Uses, Propagation
- Garden Savvy - How to Grow Beets
- Clemson University - Carrot, Beet, Radish & Parsnip | Home & Garden Information Center
- West Virginia University - Growing Beets | Extension Service | West Virginia University
Beets have a long history. In the United States, the root vegetable is just known as beets, while in the United Kingdom, they are called beetroots. The greens are commonly known usually just as beet greens. Chard is actually a variety of beet bred for greens, but chard roots are bitter, and chard is best grown for the greens only. Spinach is also in the same family. Beets were originally cultivated on the Mediterranean coast, and in ancient times were grown by the Greeks, Romans, and Egyptians, and in the near East as well. Originally grown for the greens, the beetroot has been grown for its own sake for nearly as long.

Beets have a long history. In the United States, the root vegetable is just known as beets, while in the United Kingdom, they are called beetroots. The greens are commonly known usually just as beet greens. Chard is actually a variety of beet bred for greens, but chard roots are bitter, and chard is best grown for the greens only. Spinach is also in the same family. Beets were originally cultivated on the Mediterranean coast, and in ancient times were grown by the Greeks, Romans, and Egyptians, and in the near East as well. Originally grown for the greens, the beetroot has been grown for its own sake for nearly as long.
 The well-known dark red varieties of the beet have an earthy flavor with sweet overtones. Generally, red beets are either loved or hated, and most people have a strong opinion about them, one way or the other. The lighter golden beets, and the white beets, have a milder sweet and nutty flavor. Beet greens taste a lot like their relatives, spinach and chard. They can be steamed or served as raw greens in a salad.
In ancient times, beetroots were grown and used medicinally. Beets have high vitamin content, they are high in potassium, magnesium, and B vitamins, and red beets are a good source of antioxidants. Beets have very high sugar content, and the hybrid variety known as sugar beets are bred for that, being the main source of commercially produced sugar. Sugar beets can also be grown in the garden and used to make homemade brown sugar!
- Beet: Beta Vulgaris
- Annual
- Full sun to partial shade
- Soil should be neutral or slightly acidic (6.0 to 7.0 ph)
- Well prepared soil, with good fertility
- Seed starting:
1/2″deep
3″ spacing
- Transplants:
2” deep (plant the entire clump)
3″ spacing
- Rows should be 12″ apart for both seeds and transplanted beets
- Climate Zones 2-10
There is a huge variety of beets available! The red heirloom varieties include the well-known Detroit Dark Red, the Red Ball, and the Sweetheart. The crossbred cultivars are pretty recognizable too, including the Warrior, Gladiator, and the Big Red beets among them. For the golden heirlooms, Burpee’s Golden (or just Golden) beets, and the Golden Detroit are probably best known. There are some specialty types of beets as well, like the Green Top Bunching beets (an heirloom), and the Cylindria, an elongated root hybrid. There are many more. The golden beets are very often preferred by those who dislike the more strongly flavored red beets.
Beet seeds should be planted in full sun if possible, to encourage the roots to grow to their full potential. One important note, when planting or transplanting into the garden, is that the soil should be carefully checked for underground debris or interference. Rocks and tree roots can disrupt the growth of the beetroot, interfering with their development. Fall planting can also be done, well before the first frost. Beets can be planted quite close together, but it’s important to remember that the seeds are a cluster, and young plants should be thinned by trimming the smaller plants, saving the best seedling every 3 inches or so.
Other than well-composted soil, garden-planted beets generally do not need much fertilizer, with one important exception: boron! Unlike the Mediterranean coast where beets were first grown, most garden soil is not as rich in boron. If blackened or charred looking spots appear on the beet roots, this is the cause. One simple solution is Borax™ or sodium borate. Yes, this is the laundry detergent supplement! Mix a teaspoon (or a bit less) of Borax™ with a gallon of water, which is enough for 100 square feet of garden, or proportionately less for smaller garden areas. This is a naturally occurring chemical, and will not hurt the soil in these low quantities. Another thing that is important to be aware of is to avoid too much nitrogen, as this will cause the greens to grow tall and the roots to be stunted. If the beetroots are tiny and the greens are very tall and lush, too much nitrogen in the soil is very likely the culprit.
Beets are a cool weather plant, so planting in early spring after the last frost, through early summer is best. They are somewhat frost-resistant and do not do well in warmer weather. Soil temperature should be between 50 and 85 degrees Fahrenheit, for the best condition for seeds.
Beets are also easy to grow in containers! One thing to remember about that is that the pot should be relatively deep, at least 10 inches, to allow the root to fully develop. The soil for potted beets should be prepared very carefully with well composted soil when the beets are planted. Do be prepared to fertilize them at least once during the growing season, because they tend to use up the available nutrients in the more limited supply of soil. Be careful not to use fertilizers with too much nitrogen!
There are several plants in your garden that make for good nearby companions for beets. Bush beans are a great choice, as a way of making the soil naturally rich. Pole beans, on the other hand, are a bad idea near beets! Pole beans cast too much shade, and the roots may interfere with the development of the beetroots. Cabbages and lettuce also make a nice companion for beets, due to the shallow roots, and good nutrition that they add to the soil. Some other good companions include onions, radishes, and Brussels sprouts.
Generally, beets do well in the pest and disease department, and usually, there is no issue, but there are some pests and diseases to be aware of. Cutworms can kill beets, by eating the plant at ground level. If you see a series of tiny holes in the leaves, flea beetles are likely the culprit. These can seriously damage your beets, especially younger plants. Beet leafhoppers are also a well-known pest, especially in the western part of North America. These can cause the curly top virus which can necessitate the removal of any infected plants, to prevent its spread. Leaf miners, webworms, and spider mites are among the other types of potential pests. Diseases include various types of leaf spot, verticillium wilt, and some kinds of root rot.
Straight insecticide can kill beneficial insects, it’s not the best first step to control these pests. Maintaining high quality soil can prevent many of these diseases, and pests can be controlled with row covers. Cutworms can be removed by hand, and the soil around the plant can be cleaned and partially replaced. Diatomaceous earth is another solution, this can be sprinkled on the soil around the plant. Flea beetles can be controlled with a spray of soapy water. Spider mites and leaf miners can be controlled with neem oil, and attracting insects that are their natural enemies is another effective way to combat them.
For heirloom beets, ideally, for seed harvesting, the plant leaves will be brown. The seeds can be harvested by trimming the seed clusters off the main plant. The seed clusters will be in the top 3-4 inches. Strip the seeds off into a container. Let them dry thoroughly, then separate the seeds. If the greens are harvested early, the seeds can still be saved. Cut off the top of the plant, where the seeds are, and store the plant tops for a few weeks to allow the seeds to ripen fully. Once the seeds have fully developed, strip off the seeds and separate them. They should be stored in a cool, dry place, and can be stored for over a year, if needed.


