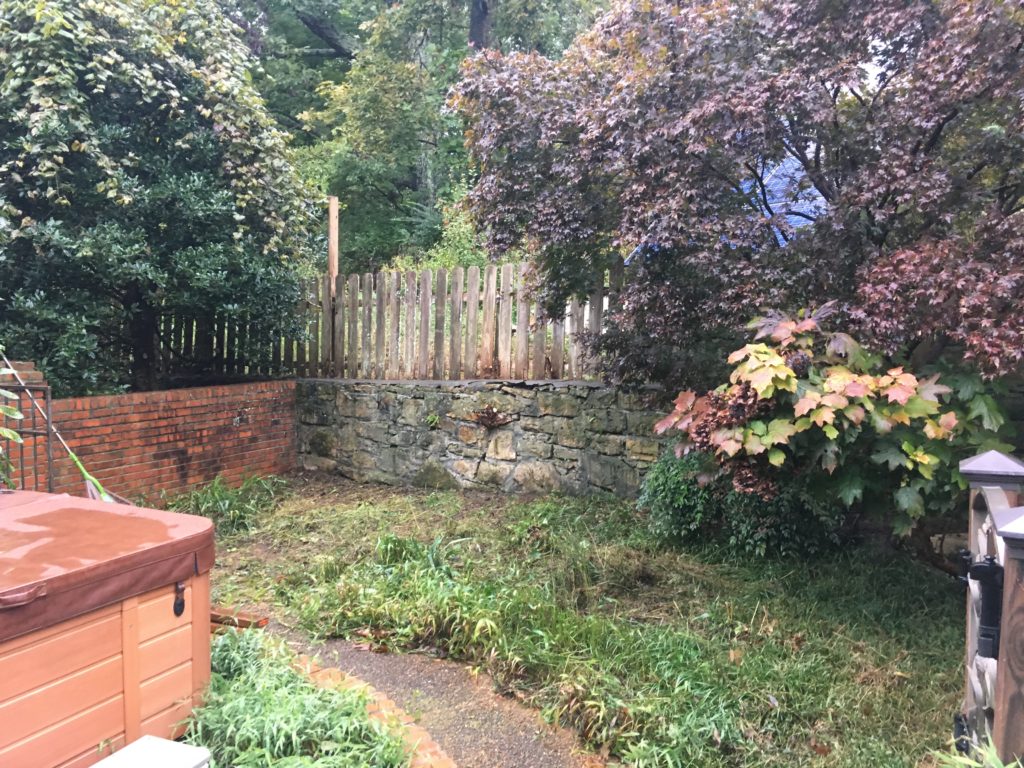
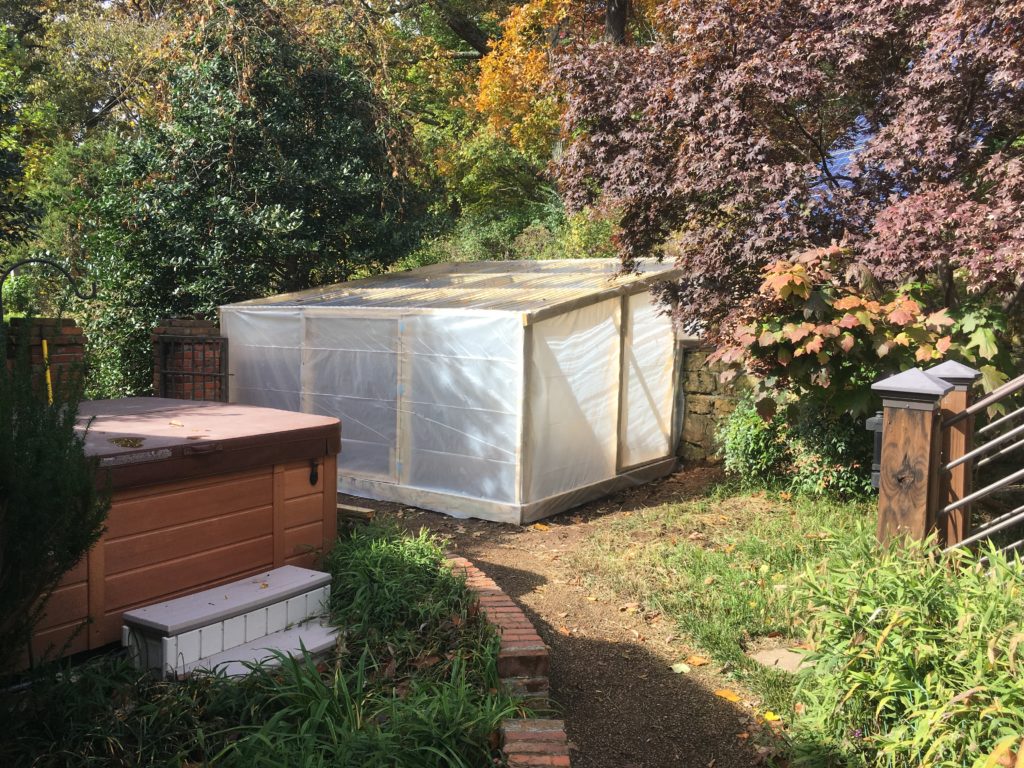
If you’re looking to extend the growing season, building your own greenhouse can be a worthwhile project! Greenhouses are an energy free way to raise the humidity and temperatures for your garden. Because of my success with greenhouse gardening, I was pretty excited when I was home visiting my parents and my mom told me she wanted to build a small greenhouse while I was in town. Their house is on the side of a hill so finding a flat spot that also a lot of good light was going to be a challenge. We found a flat spot that seemed like our best bet, the only challenge was going to be to work around an existing brick wall and an existing stone retaining wall.
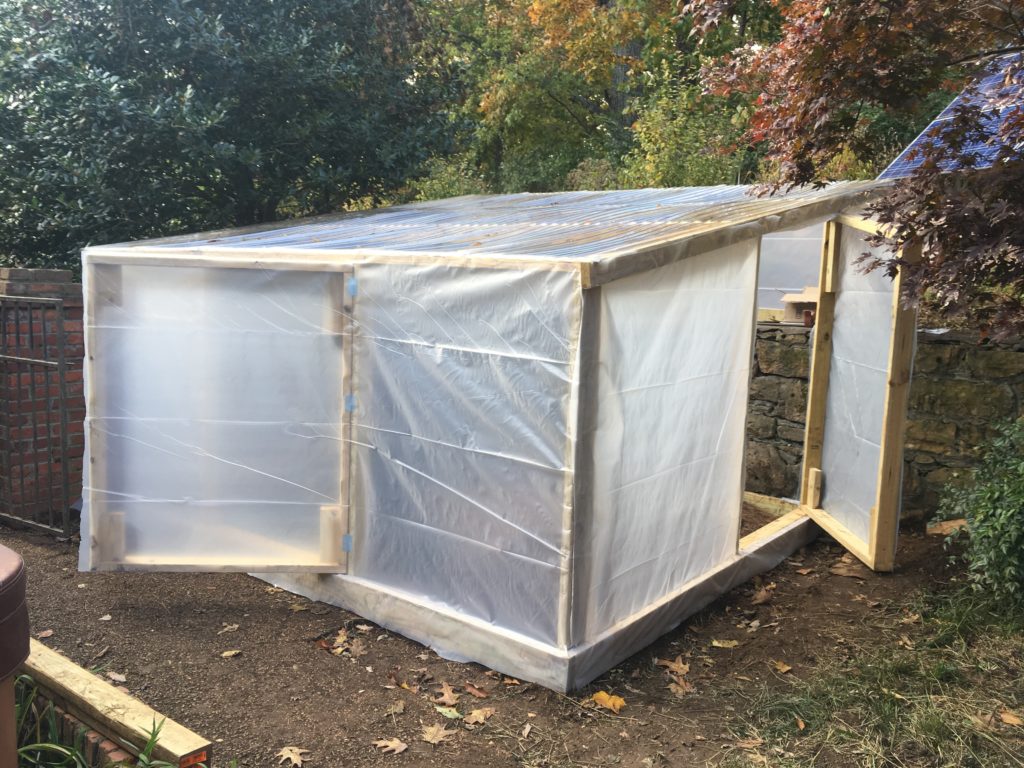
We decided on a plan. The greenhouse would have a 12’X12’ footprint and a slightly sloped roof so the front wall would be 5’ tall and the back wall would be roughly 80” tall from the floor of the greenhouse. We planned to use the brick side as the left well, and the back wall would be build on top of the stone back wall. Now we needed to build the footprint, put up each of the four walls, build the roof, install windows and doors and then finally wrap the walls with plastic tarp.
Required Materials:
These are my estimated costs, but they might vary depending on your location.
20$ – 2 – 12’ 2×6
20$ – 2 – 10’ 2×6
130$ – 17 – 12’ 2×4
35$ – 5 – 10’ 2×4
35$ – 7 – 8’ 2×4
10$ – 8 – Door hinges less than 2” wide
5$ – 3 – Gate latches
200$ – 6 – 2.17’x12’ corrugated clear plastic panels
30$ – 5lbs – 2&1/2” decking screws
20$ – 75 – 2&3/4” masonry screws
20$ – Foam filler for the plastic panel ends
20$ – 1lb – 1&1/4” screws and same size washers
25$ – 10’x25’ – 6mil clear plastic tarp
Total cost 570$
Tools:
- Impact Driver
- Drill
- Circular Saw
- Staple Gun
- Level
- Tape Measure
- Step Stool
- Utility Knife
- Masonry Drill Bit
- Wood Drill Bit
- Shovel
Many of these tools can be found and purchased by some of our great suppliers.
How to build a greenhouse
Step 1 – Preparing the Site
Before we started building the greenhouse, we first had to remove the old fence at the top of the wall and dig up all the weeds. We made quick work of the weeds and the old fence and then had to try and level out the build site for the greenhouse as much as possible. We used the level and shovel to try to get the ground as flat as possible over a 12’x10’ area, the back 2’ of the greenhouse would sit on top of the stone wall.
Step 2 – Laying Out the Frame
The first step to building the greenhouse was to lay out a frame of 2x6s that would make the base of the greenhouse. The main floor of the greenhouse would sit against the brick and stone walls. The tricky part about this was that the stone and brick walls were not square. So, I used a 10’ 2×6 to go up against the brick wall and screwed a 12’ 2×6 to each end. One of these went up against stone wall and the other I used a square to get it perpendicular to the brick wall. I measured out the length of the right side and cut the other 10’ 2×6 to fit. We then used masonry screws to anchor the 2×6 footprint to the brick and stone walls. To use masonry screws you’ll have to drill a pilot hole through the wood and the brick or stone before you can put the screws in. For the back wall, above the stone retaining wall, we decided to make use of the 4x4s in the ground from the old fence. We held the last 12’ 2×6 up against one of the posts then by measuring the distance between the ends and the ends of the 2×6 making the front wall we were able to make it parallel. One of the 4×4 would be on the outside of the greenhouse while the other would be on the inside because the original fence was not square or parallel with either of the walls. I cut off the 4×4 so it was level with the frame, so it wouldn’t be in the way later on while we put the plastic on the walls.
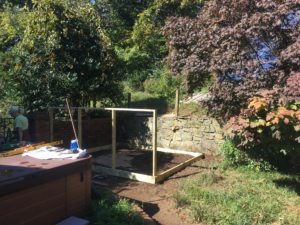
Step 3 – Building the Walls
The first wall was the simplest. It was going to be a 12’ 2×4 on the bottom and another one on the top with 4 vertical 5’ 2x4s. First, I measured out two 12’ 2x4s to make sure they were 12’ and then cut four 5’ pieces using two of the 10’ 2x4s. I laid out the 5’ boards evenly spaced and screwed the 12’ boards to the top and the bottom to make the wall. We then held the wall on the inside of the 2×6 frame and put screws through the front 2×6 to hold it into place.

The back wall was going to a bit more complicated because of the 4×4 from the old fence. Like the front wall, this wall was going to be made from a 12’ 2×4 on the top and another one on the bottom and a number of vertical 2x4s. The vertical boards for this wall were about 3’ tall and I had to cut 5 this time. One would go on either side of the 4×4 and screw into it from the sides. I measured out the distances to the 4×4 from each side and put the wall together accordingly.
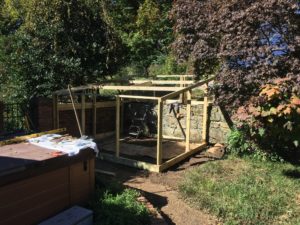
With the front and back walls done we decided it would be best to put a 12’ 2×4 on either side to make it easier to take measurements for the side walls. This was where the project got more complicated. This wall would have a 10’ 2×4 as the base but only from the front wall to the stone wall. We decided to make the door 4’ wide so using the level with the tape measure, we we could measure the height next to the stone wall, 4 feet from the stone wall and up against the front wall. These boards needed to be cut at the same angle as the roof. I screwed the 3 vertical boards on to the 10’ base and screwed it into. Next, I put a 12’ board sitting wide side down on top of this wall and screwed that into the 12’ board that was already up to make the edge of the roof. I then measured and cut boards to make the end of the wall on top of the stone wall.
I started the left wall just like the right, measuring the height at the stone wall, the height in the center and the height at the front wall. Then I screwed those three boards, with angled cuts on the top, onto a board for the base. Because the stone and brick walls were not at a right angle this side was a bit more than 10’ long so I had to cut this base out of a 12’ 2×4. Before I put the left wall up, I measured from the ground to the top of the brick wall and screwed a 2×4 onto the outside of the left wall so that it would sit against the brick wall level with the top. We drilled pilot holes into this board and the brick wall once the left wall was up and put in masonry screws to further anchor the greenhouse to the brick wall. We then put a 12’ board on the top of the left wall, just like the other side, and then I finished off the end of the wall above the stone wall. Before we moved onto the roof, I added another 2×4 on the outside of the frame just above the brick wall, this board gave us a good surface to staple the plastic onto later.
With all the walls done the only part of the frame left was the roof. The roof was going to comprise of two 12’ 2x4s connected in the middle by a 4’ board. I started by making cut outs in the ends of the 12’ boards so they could sit on the top of the walls. I then screwed the boards into place and added the 4’ piece in the middle to make it stiffer.
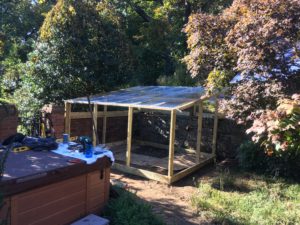
Step 4: Putting on the Roof and Building the Windows
The roof was a pretty simple part. We started on the left side putting up the panels one at a time. The panels got screwed into the boards on the sides, ends and middle with the short screws with washers on the end. To seal the ends, we found a foam cut out that would fill the ends of the panels. Each panel overlapped so it was important we tried to keep everything as straight as possible from the start. With the roof quickly done it was time to build the door and the windows.
I started with the windows because they would be easier than the door. The windows were made from four 2x4s screwed together and cut to fit inside the frame of the greenhouse. The first window would go in the center of the front wall. It’s important when building these windows to shorten each side by 1” so that it can open and close smoothly as the wood expands. I like to put a leftover piece of 2×4 in each corner of the windows to make them sturdier. All that was left to do was to attach the windows with hinges. I used 3 hinges on the front window and only 2 on the much shorter window on the back wall. The door would go into the right wall against the stone wall and was a bit more complicated because of the sloped roof. The boards that made the side of the door had to have an angle cut on the top, and the top board needed angled cuts on both sides. The support pieces on the inside of the door also had to be cut on an angle.
Step 5: Putting on the Plastic Tarp
We put the plastic tarp on with staples starting with the front wall. We unrolled enough plastic to cover the wall and cut it at the right length to make it easier to work with. We started by stapling the tarp straight across the top and then went down the left side trying to pull the plastic tight as we went. We continued to staple the plastic across the wall covering up the window along the way. After finishing this wall, we cut the plastic at the bottom and had just enough plastic to cover the back wall. We did the back wall the same way then cut the windows out on three sides, so they could open. We spread out the rest of the plastic and tried to get it straight with the bottom of the right wall and started stapling it down. After we had it stapled down, we cut it off along the roof. This left us with a piece just big enough to cover the left wall above the brick
You are not equipped to build your own greenhouse. By following our steps, you can keep the costs down, and create a greenhouse enabling you to extend your growing season indefinitely. Enjoy the fruits of your labor all year round!
If you’re looking to build a different type of greenhouse, take a look at our list of 20 DIY greenhouses.


Recent Posts
- Smart Gardening: How Technology Is Revolutionizing Horticulture
- Understanding Gardening Zones: What You Need to Know
- The Right Tools For Your Gardening And Landscaping Needs
- Maximizing Your Harvest: Square Foot Gardening Chart for Beginners
- Holiday Garden Scents: Plants for Natural Aromatherapy in Your Home